Geco

wzl-lid
Sinds 9/6/2004
T: 32
R: 169
|
30/7/2007 -
11:40u
| Quote
|
update 30 juli 2007:
twee tekeningen .. de tweede ben ik zelf, de eerste is ne kameraad. (Het is maar een uit probeersel ma k vind ze wel goed gelukt)
commentaar (goede en slechte) is welkom!

Bron: © http://users.pandora.be/gregory/tekening1.JPG

Bron: © http://users.pandora.be/gregory/tekening2.JPG
|
Do0ms3ke

wzl-lid
Sinds 22/12/2004
T:33 -
R:504
|
30/7/2007 -
19:25u
| Quote
|
Kan zelf niet goed tekenen dus je moet er niet zoveel rekening met houden
maar het lijkt alsof bij de eerste foto alsof hij geen nek heeft en bij de tweede lijk het hoofd iets te groot in verhouding met de rest.
Maar zo zie ik het, kben geen kenner é
Laatst aangepast door
Do0ms3ke
op 30/07/2007 19:48:03u
(2x aangepast)
|
Geco
wzl-lid
Sinds 9/6/2004
T:32 -
R:169
|
30/7/2007 -
19:51u
| Quote
|
alle commentaar is welkom ...
trouwens je moet geen kenner zijn om iets te beoordelen he 
een tekening moet iedereen mooi vinden anders is ze volgens mij ni goe genoeg
|
D3ton8oR

Stella-man
Sinds 15/10/2003
T:32 -
R:1581
|
31/7/2007 -
11:20u
| Quote
|
Geco schreef:
een tekening moet iedereen mooi vinden anders is ze volgens mij ni goe genoeg

toon mij dan eens een tekening die IEDEREEN mooi vindt.. beetje realistisch blijven kan ook geen kwaad he Ge gaat nooit iets kunnen tekenen da iedereen mooi vindt hoor..
|
Geco
wzl-lid
Sinds 9/6/2004
T:32 -
R:169
|
1/8/2007 -
15:06u
| Quote
|
njah ook waar 
|
zeke
wzl-lid
Sinds 16/11/2003
T:6 -
R:41
|
9/8/2007 -
21:27u
| Quote
|
How to draw a face.
--------------------------------------------------------------------------------
Step 1: You will need
Paper
Pencils
Ruler
--------------------------------------------------------------------------------
Step 2: Outline
Heads are never circular, they are oval shaped, the same as an egg. So sketch an oval outline that tapers down at the bottom.
--------------------------------------------------------------------------------
Step 3: Dividing Lines
The easiest way to start is to use dividing lines to map out the proportions of the face. Firstly, draw a line down the centre of the oval. Then cut the oval in half again, this time horizontally.
--------------------------------------------------------------------------------
Step 4: Nose
Divide the lower half again with another horizontal line. The point at which this crosses the vertical line is where you should begin to draw the base of the nose. Sketch out the base of the nose and a nostril either side.
--------------------------------------------------------------------------------
Step 5: The Mouth
Divide the bottom quarter in half again. The bottom of the lips will rest on the dividing line you have just drawn. Draw a line for where the lips meet and then draw the top lip. Now fill in the bottom of the lip.
--------------------------------------------------------------------------------
Step 6: Eyes
Now draw two big circular balls to make out the eyes across the central horizontal line. These will form the eye sockets. The top of this circle is where the eyebrow is and at the bottom is where the cheek bone sits.
Draw the eyeball floating in the centre of the socket. You then need to work on the shape of the eyes. Eyes are almond shaped, so bear this in mind as you sketch them. As a rule of thumb, the distance between the two eyes is the width of another eye.
The colour in the centre of the eyeball is called the iris. Inside the iris, draw the pupil which is the darkest bit of the eye. Fill most of it in black and leave a little white. With your pencil flat, use a bit of shading for the base. Now rub out the guidelines below the eye.
Next draw the top of the eyelid over the top of the almond. The base of the eyelid comes down over the top of the iris and covers the top of it slightly.
--------------------------------------------------------------------------------
Step 7: Shading under the Eyes
Now add a little shading underneath the eye and where the eye meets the nose to define the socket.
--------------------------------------------------------------------------------
Step 8: The Ears
The base of the ear should be drawn in line with the bottom of the nose and the top of the ear in line with the eyebrows. Remember, ears should be flat against the side of the head.
--------------------------------------------------------------------------------
Step 9: The Hair
Make sure that you draw the hair from the parting outwards.
--------------------------------------------------------------------------------
Step 10: The Neck
Necks are thicker than you imagine. Draw two lines coming down from roughly where the bottom horizontal line meets the edges of the face.
--------------------------------------------------------------------------------
Step 11: Details
Add a bit of shading under the nose and accentuate the chin and expression lines around the mouth. Then outline the ridge of the nose.
--------------------------------------------------------------------------------
Step 12: Clean Up
Use a rubber to remove any guidelines.
Het filmke kunt ge
hier zien.
Tees legt u de basis uit over hoeda ge een gezicht moet tekenen. Als ge hierop ewa oefent dan weet ge de verhoudingen van u gezichten en dan gaat het er ook beter uitzien. Let wel op: dit is een filmke dat gewoon de juiste verhoudingen laat zien, pas als ge dit kunt kunde op de details beginnen letten (dit filmken let ook ni op de details)
Als ge uw gezicht in een andere richting wilt tekenen dan moete het vergelijken met nen ballon (zoals ge hieronder kunt zien) de verhoudingen blijven hetzelfde ma uw schiklijnen lopen anders. PAS OP: dit is voor manga gezichten te tekenen. Die lijnen lopen ewa anders ma ik wil u nekeer laten zien hoeda ge uw gezicht moet tekenen wanneer het niet naar voor gericht is.
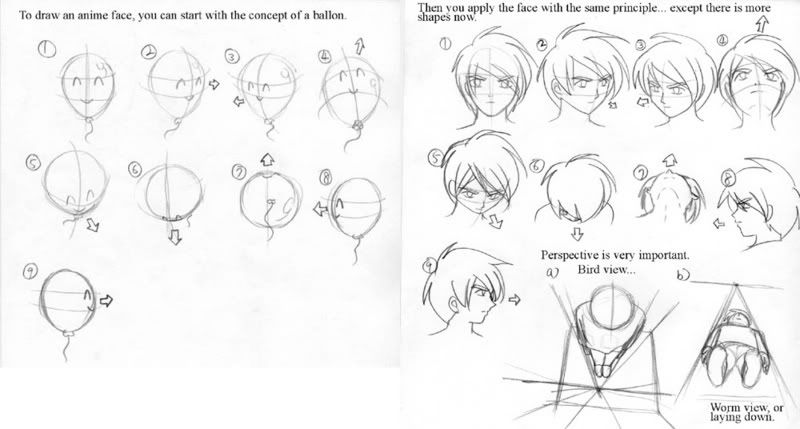
Bron: © http://i20.photobucket.com/albums/b202/reSIKEL/Anime_art_lesson_8.jpg
Khoop da ge der iets mee kunt doen, uw tekeningen zijn zeker ni slecht, ze moeten gewoon hier en daar ewa bijgewerkt worden. Nog ewa oefenen en dan komt da goe.
good luck doing it.
|
Geco
wzl-lid
Sinds 9/6/2004
T:32 -
R:169
|
10/8/2007 -
7:30u
| Quote
|
wow das wel super vriendelijk van u da ge dees ier post!
hiermee kan ik zeker en vast aan de slag!
|

